If you’ve heard the term darkroom, but you’re not sure what it is or how it’s used, hopefully we’ll be able to explain the process for you here.
The darkroom process isn’t one that’s widely used in photography anymore, since the birth of digital photography (where the darkroom process is no longer needed to print images). However, before digital photography was popular, and back when film photography was more widely used, you would need a darkroom to process and develop your photographs.
But even with the revolution of digital photography and the ease it brings to processing, there are many photographers who still use photography darkrooms today because they love using film and traditional methods. Film photography is often softer and less sharp than digital, so it’s wonderful for portraits, and it’s still very popular for weddings.
You’ll often find darkrooms in universities, schools and photography schools, but it’s also easy to set one up in your home if you have the space and time.
What is a Darkroom used for?
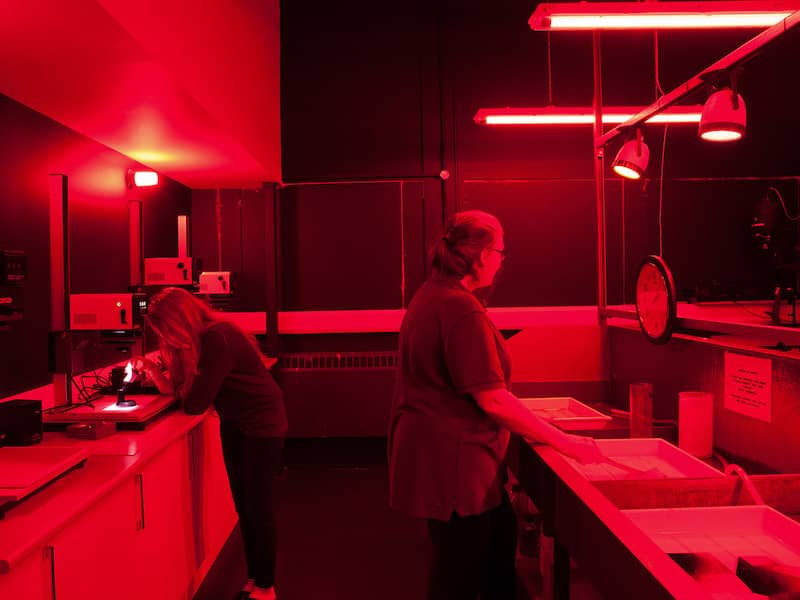
The darkroom is a blacked out room (no light must enter) often in a workshop or studio space. Photographers use this darkroom space to turn film roll into prints. It’s worth noting, in the blacked-out room, there is a still a red light giving you the ability to see – but that doesn’t affect the development process.
For traditional film photography, a darkroom is the place used to develop and perfect the photographs. For lots of photographers, the darkroom process is as much a part of the fun as the photography itself, as it involves balancing a range of different chemicals, controlled light, and time. You can edit and change aspect of the image in the developing stage, and it’s in the dark room that you can do techniques such as dodging and burning – to increase or decrease light exposure.
How Can I set-up a Darkroom?
A darkroom in photography can be any room – you just need space and darkness. You’ll want to ensure you have no light leaking in, because materials involved in photo processing and developing are extremely light sensitive. Ensure you have thick window covers (canvas or thick card works well on a budget) and look for cracks under doors too.
You’ll want to make sure you have key areas of the room signalled with glow-in-the-dark signs, so you can find what you’re looking for when you’re in there! How you set up your darkroom will depend on what kind of prints you’re developing. But here is a brief list of what you’ll need:
- An enlarger (you don’t need to opt for an expensive one at first, and cheap ones can be purchased easily)
- A large, steady, flat surface
- A timer (but not your phone, as this might cause unnecessary light exposure)
- A safelight (not powered by the mains) that has a general purpose filter applied
- Photographic paper
- Trays for developing images
- Appropriate chemicals and liquids for developing (you’ll find these in most photography shops)
It’s only with this development that pioneers of early photography were able to bring their images to life.
Leave A Comment